Are you an admin who has written quite a few pages but feels unsure about what to do next? Don’t worry, creating great content is just the starting point!
As an admin, it’s essential to consider how you can enhance your pages and make them more accessible. By doing so, you can foster inclusivity and watch your wiki flourish as a result. In this blog post, we’ll guide you through some simple and fundamental improvements you can make to your articles. These changes will not only make your pages more appealing but also prove to be incredibly worthwhile—we guarantee it!
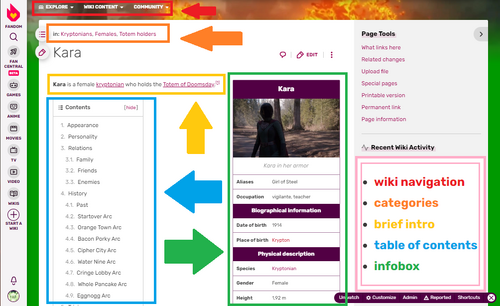
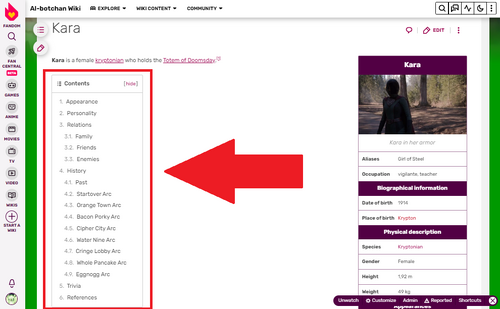
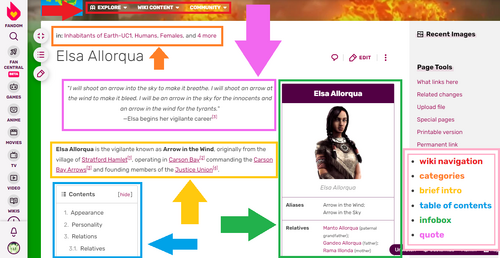
To create a good page, consider more than just the text. An infobox is very useful for showing the most important information, as well as an image to make it clear who or what you are talking about. When placing content in the page, make sure it is well organized: divide the text into sections, add relevant images, use the right categories, maybe also insert a separate section for an image gallery. An organized page is more engaging than plain text. Start with a broad introduction that covers the character's name, role in the story, and relationships with other important elements.
Content length and layout[]
The content is the key component of a page. It should be comprehensive and include all necessary information. You are a fan - consider what you would like to read about on a fansite. For a character, cover their physical appearance, personality, abilities, history, interesting facts, trivia, and more. Be thorough, and include information from various sources such as chapters, episodes, official sites, additional volumes, special editions, and interviews.
Each section is important and should be as exhaustive. The history section, the longest part, should be divided into subsections to cover the character's past and their involvement in different plot arcs or seasons. Dive deep into the personality and relationships, exploring how the character interacts with others and how they are perceived. This mainly applies to media such as manga, anime, television series, and movies. For video games, prioritize information about gameplay, weapons and armor, combat systems, and the other features a gamer may be interested in. However, do not neglect the lore, as it is one of the pillars of a good game. When consulting a wiki, you expect information beyond what you can gather from reading the manga, watching the series, or playing the game - that's why we refer to these sites as encyclopedic sources.
Categories[]
Each page must have at least one meaningful category, and all categories on the page must make sense, both individually and together. Avoid overly broad or overly specific categories, as well as an excessive number of categories on a single page, as this can confuse and overwhelm readers.
By convention, category names are usually plural, but it's not mandatory. It is also advisable to keep the same style of categorization in all similar pages to maintain coherence and ease of navigation. Let's take a character's page as an example: relevant categories could include biological data ("Humans", "Females", "Deceased"), affiliations or titles ("Members of the High Council", "Holy Knights", "Emperors", "Revolutionaries"), and significant characteristics ("Archers", "Totem holders", "Characters with a devil fruit", "Time travelers").
Every category should be properly categorized. Clicking on a category will lead you to its page in the Category: namespace, where you'll categorize that category itself. Think of it working like a genealogical tree that starts from the parent category, branching into the sections, such as "Contents", and is further divided until it reaches a sufficient level of specificity (for example "Contents" → "Characters" → "Aliens" → "Kryptonians"). Aim for useful specificity (like "Kryptonians"), while avoiding excessive detail (like "Kryptonians born on Argo and raised on Earth"). You should also avoid long category names, which is easily achieved by following the previous point. If a page already has a subcategory of a certain category (e.g., "Kryptonians"), it is unnecessary to include the parent category ("Aliens") as it becomes redundant.
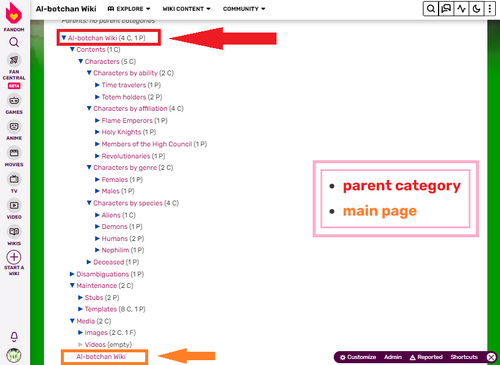
Each category should have its own dedicated page, known as the Category: page. This page should have a descriptive title and provide a clear explanation of the category's contents. A brief sentence or two is sufficient to indicate which pages are grouped within the category. For example, the page "Category:Nephilim" could have a description like "''[[Devil May Cry]]'' characters belonging to the race of [[Nephilim]], that are individuals born from the union of a [[Demons|Demon]] and a [[Humans|Human]]." - this Category: page describes which pages are included in the category.
Infoboxes[]
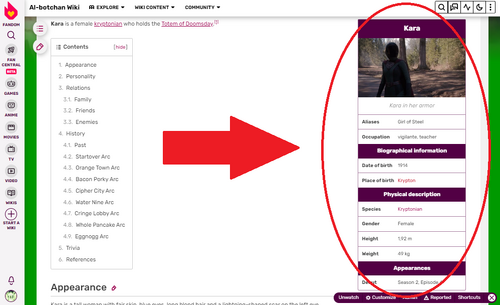
Infoboxes are special templates with the "Infobox" type and represent a very important point in each content page, of which they show the main information in a clear and succinct way. These table information cards are located in the upper right corner of the page and generally contain the name of the page, a representative image, and basic information (such as relationships, affiliations, first appearance in the franchise, actors and voice actors, dates of birth and death, and other characteristic data.) Serving as a summary, infoboxes present the most important and distinctive aspects in a straightforward and easily understandable format.
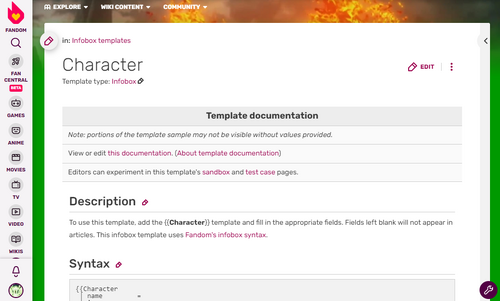
Infoboxes are created in the Template: namespace to ensure uniformity and consistency across a wiki. Creating them as templates enables easier utilization within articles. While it is technically possible to write infobox codes directly on pages, this practice is strongly discouraged. Direct coding can complicate matters for new users, increase the likelihood of errors, and most importantly, undermine the wiki's identity.
When founding a wiki, default infoboxes are provided as a helpful starting point. These infoboxes encompass the primary article types you might require. However, you can choose to modify, delete, or create new infoboxes based on the specific needs of your wiki.
How to use an infobox in a page[]
Visual editor[]
To use visual editor follow these steps: If it is the default editor in your preferences, click the "EDIT" button. Otherwise, select "VisualEditor" from the drop-down menu on the right or add ?veaction=edit at the end of the url.
Next, click on "INSERT" and then "Infobox." Choose the desired infobox and fill in the parameter fields (e.g., "name," "image") in the displayed pop-up. Additional information can be inserted at the bottom, such as parameters that were skipped in the initial list due to the infobox's length. If a parameter is inserted that doesn't exist in the template, it will be added to the page code but won't have any functionality.
Once all the fields are filled (or even if some are left empty), click "APPLY." If the rest of the page meets your requirements, click "SAVE." Note that the visual editor places the code on a single line unless line breaks are manually added while filling in the fields. Empty fields are completely ignored by the visual editor.
More advanced steps[]
For more advanced advice and best practices, visit the blog post titled ""I have added and structured more content, what are the next advanced steps?". It covers additional steps and offers guidance on using the source editor for adding and editing an infobox.
Forums[]
If you feel a little alone on the new wiki, consider promoting it through a Discussions post on Community Central's Discussions. Create a post introducing the wiki's topic, letting reader's know your passion for it, and using compelling images and phrases to engage potential new editors. Then, just sit back and wait for their replies!

Taking the Next Steps: Wiki Administration
 I founded a new wiki - what now?
 I have added some content, what is next?
 I Want to See What I And Others Worked On - Is There A Feed?
 I want to create my custom template or infobox - how do I do that?


