Today we shall be learning how to create a bot using JavaScript (JS) to help with mass edits on a wiki. Specifically in two areas: the mass categorisation of images and adding licensing templates to them to demonstrate first hand how helpful bots are, and to significantly improve a Wiki.
How bots can help[]
To illustrate mass editing first hand, this blog post shall detail using one to add images into categories as well as add licensing templates to them on the Banana Fish Wiki. Carrying out this task manually without a bot would involve choosing one image at a time on an image gallery page, scrolling down to choose edit to add the Fair use licensing template in the 'About' section then save. Then adding the Episode 01 Images and Fairuse categories that the respective images need to be added to, then choosing save again.
Then doing this for every image in that image gallery and across the twenty four image galleries for the anime episodes. A bot is the best help for a wiki here since it can do this a lot quicker and much more efficiently.
We are going to turn the image on the left below, and add the two categories above with the licensing template underneath so it looks like the image on the right to provide necessary information. Even better the bot can do this for all 300+ images in an episode image gallery, 24 times for the total episodes.


Step 1 Create your bot[]
Log out, think of a name, create a new account and test the below somewhere such as on the Community Test Wiki. It is best practice to consult with the wiki community you are on and be a bureaucrat at which point send it to Special:Contact/general as only Fandom staff are able to attach the “BOT” flag. This is so the changes will not flood wiki activity, or the recent activity sections.
Step 2: Add the JavaScript you like[]
As a JS bot the tools it requires to help in the desired areas will need to be given to it. Though there are many JS options for other areas, for the practical purposes here these three ones are needed:
These are to be placed in the bots common.js page. To find that type common.js after the bots name in the web address, like so for Ph1i5-B0t:
https://banana-fish.fandom.com/wiki/User:Ph1i5-B0t/common.js
This is where the scripts can all be added together, the below is all good to be copied and pasted onto a bots js page:

importArticles({
    type: 'script',
    articles: [
        'u:dev:FindAndReplace/code.js',
        'u:dev:MassCategorization/code.js',
        'u:dev:MassEdit/code.js',
    ]
})
Which shall appear as on the right on the bots common.js page and with these, new options are available for our bot.
Possible troubleshooting issues and how to resolve them[]
At this stage if there are troubleshooting issues namely that the MassEdit, MassCategorization and so forth are not appearing under My Tools, first try checking your browzer's console.
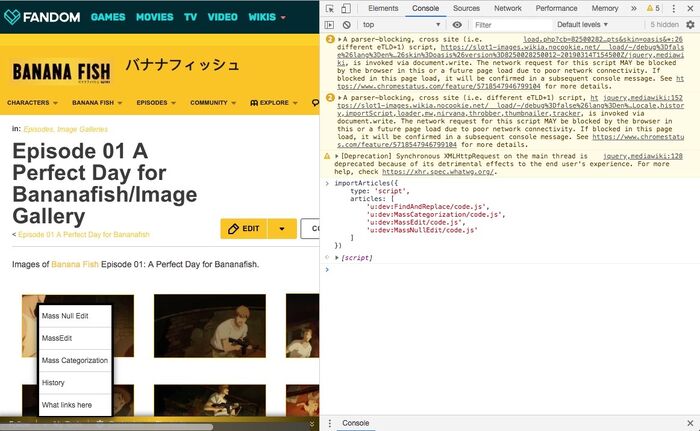
Following the process, it can conclude with the script being copied and pasted there to the point where the options are now available under "My Tools" at the bottom of the screen, like this:

Adding the JS to the browzer's console on the right (the red text) can allow the tools to appear on the left as in the above image (if this issue even arises) where MassEdit and MassCategorization are visible in the list on the Episode 01 image gallery section. FindAndReplace appears in source mode on a page, MassNullEdit is an example of a separate unrelated to this process JS script that will appear there.
- To fully resolve this so they do appear without having to access the browzer console each time.
To ensure the script does not need to be copied and pasted each time the bot is to use these functions, under Special:Preferences choose Under the Hood and tick Enable personal JavaScript that should make the scripts appear. If further problems are found it's best to message for help, but let's assume everything is working as it should be.
Bot fully set up, now having it help the wiki![]
With the bot possessing the tools it needs, it is now able to carry out what it takes to add images to categories and add licensing templates as well.
To begin with having the bot add licensing templates to images.
Step 3: Using a bot to add Licensing Templates to images[]
Using MassEdit[]
MassEdit is what is needed to add licensing templates to all images. Since in this case they are anime images it is best to inform others that they are copyrighted and are being used for informative purposes falling under Fairuse. The Banana Fish Wiki's Fairuse template was created for that purpose, this is going to be placed under each image in the "About" section. First we need the image names but image file names will need the "File:" prefix, this one below will work:
File:Episode 1 - Screenshot 1.png
The one below will not be added since it is missing the 'File:' in front of the image title. An issue on the wiki where the images deliberately omit the File: for conciseness purposes in the code.
Episode 1 - Screenshot 1.png
Concurrent Step: Using FindAndReplace[]
FindAndReplace is going to be used in tandem with MassEdit and MassCategorization to get the File: required for both processes to work.
Locating FindAndReplace[]
FindAndReplace appears not under My Tools but within the source editor on a page. Our bot has it's third excellent ability, it is going to use FindAndReplace but only to add 'File:' to every image in order to copy and paste.
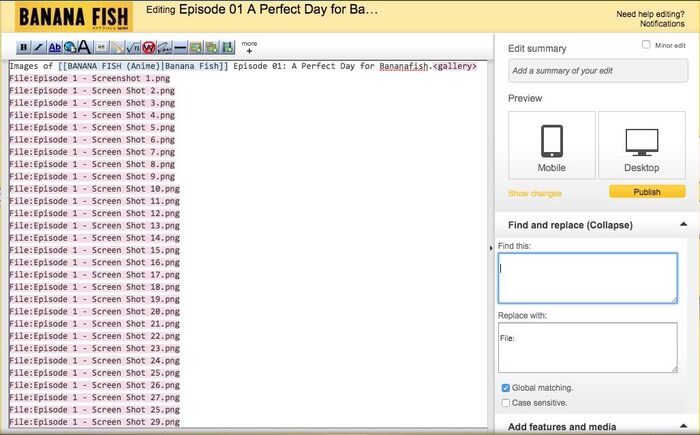
On an image gallery page choose Edit, underneath the 'Publish' button Find and replace can be found:
- Press enter in the 'Find this' box so the cursor appears in the second line like in the image below.
- Type File: in the 'Replace with:' box.
This has been done in the below image, in source editor on the image gallery: enter had been pressed on the first box, File: has been added resulting in that being added before each image name.

This is not to be saved, the purpose is to add File: in front of all the images to copy and paste them into the "Enter pages" box when MassEdit is chosen under My Tools on a page. MassEdit will add the licensing template to the copied and pasted images that have File: in front of the names.
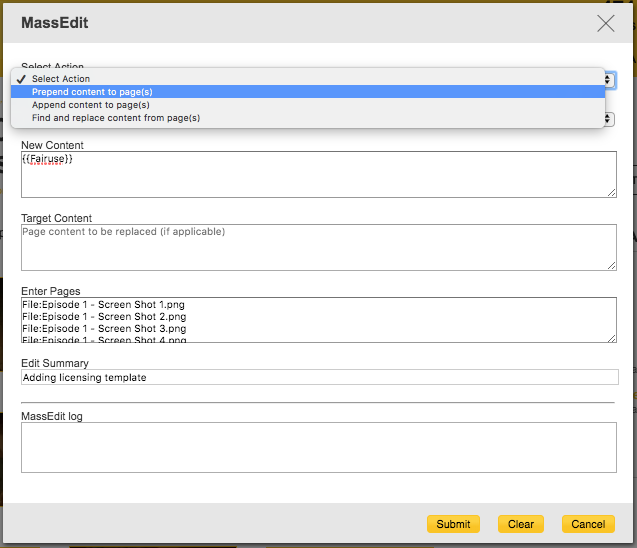
Input the page names into MassEdit in the 'Enter Pages' box, choose “Prepend” and place {{Fairuse}} in the “New Content” box as in the image below, choose 'Submit'.
Behold the magic of bots as it gradually adds the licensing templates to the images! The bot will add the list of images gradually, good that it is working as intended, rather than a sudden drastic 300+ changes all at once. The licensing template will have been added to each of our images like in the top right image of this blog.
Now to add the images to the two categories: the Fairuse category and the episode number category.
Step 4: Adding Images to categories[]
Using MassCategorization[]
Just like with MassEdit, now FindAndReplace is going to be used in tandem with MassCategorization. The time has come to add the Episode (number) Images and Fairuse categories to images one gallery at a time (or all at once for Fairuse).
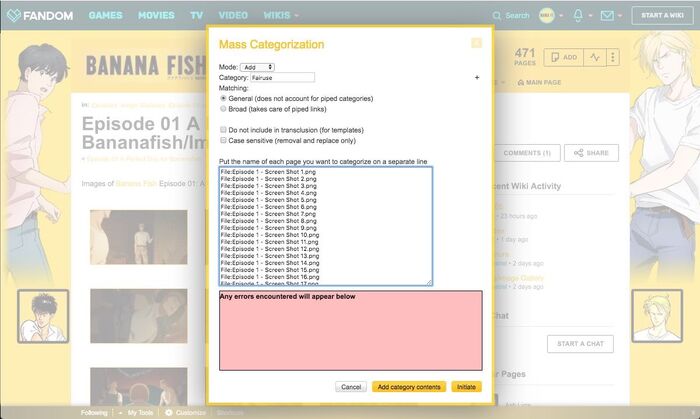
Again, in source editor on a gallery use FindAndReplace to place File: in front of all the image names. As before this will not be saved, the purpose is to add File: in front of all the images to copy and paste them into MassCategorization with the true goal of adding categories. Copy the names and paste them after choosing MassCategorization found under 'My Tools'.
Here the image names have been pasted in the box which will appear like this with the Fairuse category ready to be added having been written at the top:

Choose 'Initiate' and witness first hand the deeper magic of bots take place!
After this process is complete, the images are now added to the Wiki's Fairuse category. This helps with navigation, people can choose that category to find the images and of course declares the purpose of their use so that they are not removed from the Wiki which is very important to say the least.
Practice Makes Perfect, Add the Images to their Second Category![]
Carry out the exact same process with FindAndReplace to add image titles to MassCategorization this time adding the images in an image gallery to an episode number category, step by step:
- In source mode use FindAndReplace to add File: to images that do not have it.
- Copy the list into MassCategorization and add the desired category:
- Episode 01 Images
- Episode 02 Images
- Episode 03 Images and so forth depending on the image gallery.
The combination of the bot using two JavaScript tools has allowed us to add entire galleries worth of images to the required categories.
All done![]
The information here is adapted from it's first appearance on a blog post on the Banana Fish Wiki to demystify bots and make them more familiar since they are so helpful to Wikis. Credits to the TheGoldenPatrik1 for explaining how to create and use a JS bot, also a throwback to A Practical Guide to Bots!
This concludes how to create and practically have a bot help with mass edits. That a bot can perform this phenomenal feat of adding licensing templates along with images to the appropriate categories faster and more efficiently is a testament to how helpful bots can be in these two areas alone.
These were just two areas, bots are able to help with making many large scale improvements, Fandom has further information on bots here. Reading, practical learning by trying this for yourself, asking questions, whichever helps encourage participating in the joy of bots!


