To add interactions to blocks using the Interactivity API, developers can use:
- Directives: Added to the markup to add specific behavior to the DOM elements of the block
- Store: Contains the logic and data (state, actions, side effects, etc.) needed for the behavior
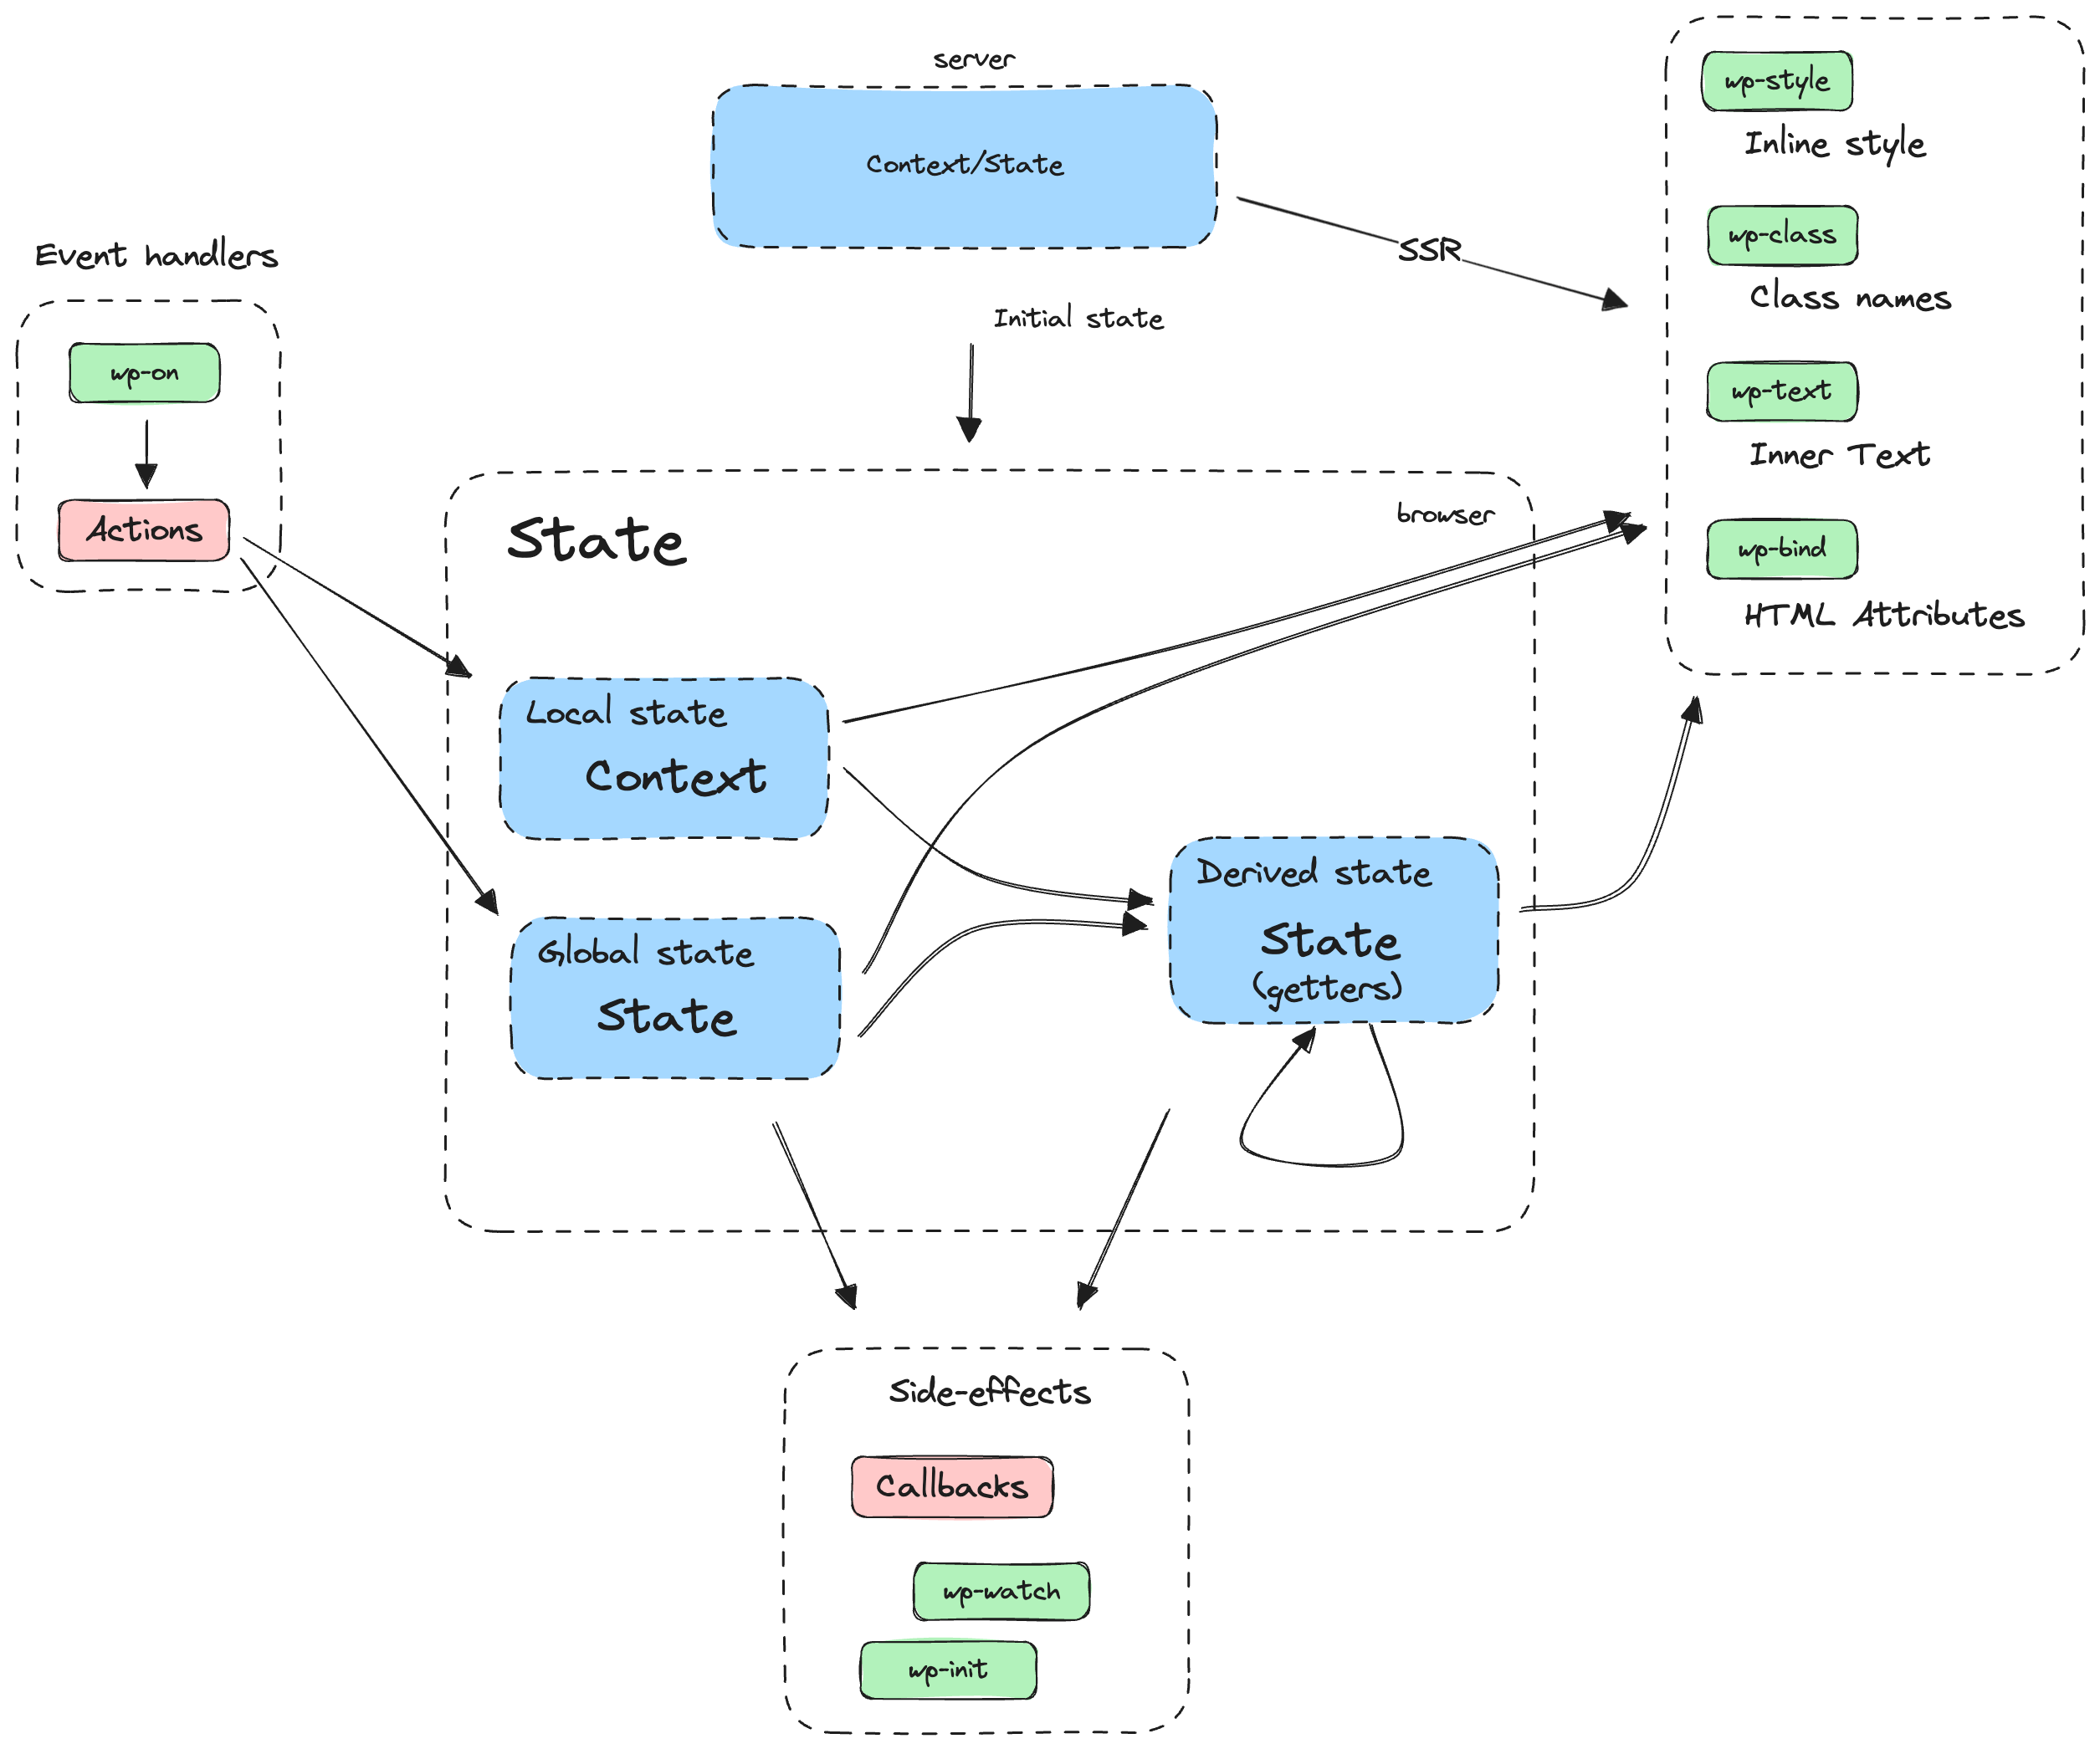
DOM elements are connected to data stored in the state and context through directives. If data in the state or context change directives will react to those changes, updating the DOM accordingly (see diagram).
What are directives?
Directives are custom attributes that are added to the markup of your block to add behavior to its DOM elements. This can be done in the render.php file (for dynamic blocks) or the save.js file (for static blocks).
Interactivity API directives use the data- prefix. Here’s an example of directives used in HTML markup.
<div
  data-wp-interactive="myPlugin"
  data-wp-context='{ "isOpen": false }'
  data-wp-watch="callbacks.logIsOpen"
>
  <button
    data-wp-on--click="actions.toggle"
    data-wp-bind--aria-expanded="context.isOpen"
    aria-controls="p-1"
  >
    Toggle
  </button>

  <p id="p-1" data-wp-bind--hidden="!context.isOpen">
    This element is now visible!
  </p>
</div>
Directives can also be injected dynamically using the HTML Tag Processor.
With directives, you can directly manage interactions such as side effects, state, event handlers, attributes, or content.
List of Directives
wp-interactive
The wp-interactive directive “activates” the interactivity for the DOM element and its children through the Interactivity API (directives and store). The directive includes a namespace to reference a specific store, that can be set as a string or an object.
<!-- Let's make this element and its children interactive and set the namespace -->
<div
  data-wp-interactive="myPlugin"
  data-wp-context='{ "myColor" : "red", "myBgColor": "yellow" }'
>
  <p>I'm interactive now, <span data-wp-style--background-color="context.myBgColor">>and I can use directives!</span></p>
  <div>
    <p>I'm also interactive, <span data-wp-style--color="context.myColor">and I can also use directives!</span></p>
  </div>
</div>

<!-- This is also valid -->
<div
  data-wp-interactive='{ "namespace": "myPlugin" }'
  data-wp-context='{ "myColor" : "red", "myBgColor": "yellow" }'
>
  <p>I'm interactive now, <span data-wp-style--background-color="context.myBgColor">>and I can use directives!</span></p>
  <div>
    <p>I'm also interactive, <span data-wp-style--color="context.myColor">and I can also use directives!</span></p>
  </div>
</div>
data-wp-interactive is a requirement for the Interactivity API “engine” to work. In the following examples the data-wp-interactive has not been added for the sake of simplicity. Also, the data-wp-interactive directive will be injected automatically in the future.
wp-context
It provides a local state available to a specific HTML node and its children.
The wp-context directive accepts a stringified JSON as a value.
//render.php
<div data-wp-context='{ "post": { "id": <?php echo $post->ID; ?> } }' >
  <button data-wp-on--click="actions.logId" >
    Click Me!
  </button>
</div>
See store used with the directive above
store( "myPlugin", {
  actions: {
    logId: () => {
      const { post } = getContext();
      console.log( post.id );
    },
  },
} );
Different contexts can be defined at different levels, and deeper levels will merge their own context with any parent one:
<div data-wp-context="{ foo: 'bar' }">
  <span data-wp-text="context.foo"><!-- Will output: "bar" --></span>

  <div data-wp-context="{ bar: 'baz' }">
    <span data-wp-text="context.foo"><!-- Will output: "bar" --></span>

    <div data-wp-context="{ foo: 'bob' }">
      <span data-wp-text="context.foo"><!-- Will output: "bob" --></span>
    </div>

  </div>
</div>
wp-bind
This directive allows setting HTML attributes on elements based on a boolean or string value. It follows the syntax data-wp-bind--attribute.
<li data-wp-context='{ "isMenuOpen": false }'>
  <button
    data-wp-on--click="actions.toggleMenu"
    data-wp-bind--aria-expanded="context.isMenuOpen"
  >
    Toggle
  </button>
  <div data-wp-bind--hidden="!context.isMenuOpen">
    <span>Title</span>
    <ul>
      SUBMENU ITEMS
    </ul>
  </div>
</li>
See store used with the directive above
store( "myPlugin", {
  actions: {
    toggleMenu: () => {
      const context = getContext();
      context.isMenuOpen = !context.isMenuOpen;
    },
  },
} );
The wp-bind directive is executed:
- When the element is created
- Each time there’s a change on any of the properties of the
stateorcontextinvolved in getting the final value of the directive (inside the callback or the expression passed as reference)
When wp-bind directive references a callback to get its final value:
- The
wp-binddirective will be executed each time there’s a change on any of the properties of thestateorcontextused inside this callback. - The returned value in the callback function is used to change the value of the associated attribute.
The wp-bind will do different things when the DOM element is applied, depending on its value:
- If the value is
true, the attribute is added:<div attribute> - If the value is
false, the attribute is removed:<div> - If the value is a string, the attribute is added with its value assigned:
<div attribute="value" - If the attribute name starts with
aria-ordata-and the value is boolean (eithertrueorfalse), the attribute is added to the DOM with the boolean value assigned as a string:<div aria-attribute="true">
wp-class
This directive adds or removes a class to an HTML element, depending on a boolean value. It follows the syntax data-wp-class--classname.
<div>
  <li
    data-wp-context='{ "isSelected": false }'
    data-wp-on--click="actions.toggleSelection"
    data-wp-class--selected="context.isSelected"
  >
    Option 1
  </li>
  <li
    data-wp-context='{ "isSelected": false }'
    data-wp-on--click="actions.toggleSelection"
    data-wp-class--selected="context.isSelected"
  >
    Option 2
  </li>
</div>
See store used with the directive above
store( "myPlugin", {
  actions: {
    toggleSelection: () => {
      const context = getContext();
      context.isSelected = !context.isSelected
    }
  }
} );
The wp-class directive is executed:
- When the element is created
- Each time there’s a change on any of the properties of the
stateorcontextinvolved in getting the final value of the directive (inside the callback or the expression passed as reference)
The boolean value received by the directive is used to toggle (add when true or remove when false) the associated class name from the class attribute.
It’s important to note that when using the wp-class directive, it’s recommended to use kebab-case for class names instead of camelCase. This is because HTML attributes are not case-sensitive, and HTML will treat data-wp-class--isDark the same as data-wp-class--isdark or DATA-WP-CLASS--ISDARK.
So, for example, use the class name is-dark instead of isDark and data-wp-class--is-dark instead of data-wp-class--isDark:
<!-- Recommended -->
<div data-wp-class--is-dark="context.isDarkMode">
  <!-- ... -->
</div>

<!-- Not recommended -->
<div data-wp-class--isDark="context.isDarkMode">
  <!-- ... -->
</div>
/* Recommended */
.is-dark {
  /* ... */
}

/* Not recommended */
.isDark {
  /* ... */
}
wp-style
This directive adds or removes inline style to an HTML element, depending on its value. It follows the syntax data-wp-style--css-property.
<div data-wp-context='{ "color": "red" }' >
  <button data-wp-on--click="actions.toggleContextColor">Toggle Color Text</button>
  <p data-wp-style--color="context.color">Hello World!</p>
</div>
>
See store used with the directive above
store( "myPlugin", {
  actions: {
    toggleContextColor: () => {
      const context = getContext();
      context.color = context.color === 'red' ? 'blue' : 'red';
    },
  },
} );
The wp-style directive is executed:
- When the element is created
- Each time there’s a change on any of the properties of the
stateorcontextinvolved in getting the final value of the directive (inside the callback or the expression passed as reference)
The value received by the directive is used to add or remove the style attribute with the associated CSS property:
- If the value is
false, the style attribute is removed:<div> - If the value is a string, the attribute is added with its value assigned:
<div style="css-property: value;">
wp-text
It sets the inner text of an HTML element.
<div data-wp-context='{ "text": "Text 1" }'>
  <span data-wp-text="context.text"></span>
  <button data-wp-on--click="actions.toggleContextText">
    Toggle Context Text
  </button>
</div>
See store used with the directive above
store( "myPlugin", {
  actions: {
    toggleContextText: () => {
      const context = getContext();
      context.text = context.text === 'Text 1' ? 'Text 2' : 'Text 1';
    },
  },
} );
The wp-text directive is executed:
- When the element is created
- Each time there’s a change on any of the properties of the
stateorcontextinvolved in getting the final value of the directive (inside the callback or the expression passed as reference)
The returned value is used to change the inner content of the element: <div>value</div>.
wp-on
wp-on-async instead if your directive code does not need synchronous access to the event object. If synchronous access is required, consider implementing an async action which yields to the main thread after calling the synchronous API.
This directive runs code on dispatched DOM events like click or keyup. The syntax is data-wp-on--[event] (like data-wp-on--click or data-wp-on--keyup).
<button data-wp-on--click="actions.logTime" >
  Click Me!
</button>
See store used with the directive above
store( "myPlugin", {
  actions: {
    logTime: ( event ) => {
      console.log( new Date() )
    },
  },
} );
The wp-on directive is executed each time the associated event is triggered.
The callback passed as the reference receives the event (event), and the returned value by this callback is ignored.
wp-on-async
This directive is a more performant approach for wp-on. It immediately yields to main to avoid contributing to a long task, allowing other interactions that otherwise would be waiting on the main thread
to run sooner. Use this async version whenever there is no need for synchronous access to the event object, in particular the methods event.preventDefault(), event.stopPropagation(), and event.stopImmediatePropagation().
wp-on-window
wp-on-async-window instead if your directive code does not need synchronous access to the event object. If synchronous access is required, consider implementing an async action which yields to the main thread after calling the synchronous API.
This directive allows you to attach global window events like resize, copy, and focus and then execute a defined callback when those happen.
List of supported window events.
The syntax of this directive is data-wp-on-window--[window-event] (like data-wp-on-window--resize
or data-wp-on-window--languagechange).
<div data-wp-on-window--resize="callbacks.logWidth"></div>
See store used with the directive above
store( "myPlugin", {
    callbacks: {
        logWidth() {
            console.log( 'Window width: ', window.innerWidth );
        },
    },
} );
The callback passed as the reference receives the event (event), and the returned value by this callback is ignored. When the element is removed from the DOM, the event listener is also removed.
wp-on-async-window
Similar to wp-on-async, this is an optimized version of wp-on-window that immediately yields to main to avoid contributing to a long task. Use this async version whenever there is no need for synchronous access to the event object, in particular the methods event.preventDefault(), event.stopPropagation(), and event.stopImmediatePropagation(). This event listener is also added as passive.
wp-on-document
wp-on-async-document instead if your directive code does not need synchronous access to the event object. If synchronous access is required, consider implementing an async action which yields to the main thread after calling the synchronous API.
This directive allows you to attach global document events like scroll, mousemove, and keydown and then execute a defined callback when those happen.
List of supported document events.
The syntax of this directive is data-wp-on-document--[document-event] (like data-wp-on-document--keydown
or data-wp-on-document--selectionchange).
<div data-wp-on-document--keydown="callbacks.logKeydown"></div>
See store used with the directive above
store( "myPlugin", {
    callbacks: {
        logKeydown(event) {
            console.log( 'Key pressed: ', event.key );
        },
  },
} );
The callback passed as the reference receives the event (event), and the returned value by this callback is ignored. When the element is removed from the DOM, the event listener is also removed.
wp-on-async-document
Similar to wp-on-async, this is an optimized version of wp-on-document that immediately yields to main to avoid contributing to a long task. Use this async version whenever there is no need for synchronous access to the event object, in particular the methods event.preventDefault(), event.stopPropagation(), and event.stopImmediatePropagation(). This event listener is also added as passive.
wp-watch
It runs a callback when the node is created and runs it again when the state or context changes.
You can attach several side effects to the same DOM element by using the syntax data-wp-watch--[unique-id].
The unique-id doesn’t need to be unique globally. It just needs to be different from the other unique IDs of the wp-watch directives of that DOM element.
<div
  data-wp-context='{ "counter": 0 }'
  data-wp-watch="callbacks.logCounter"
>
  <p>Counter: <span data-wp-text="context.counter"></span></p>
  <button data-wp-on--click="actions.increaseCounter">+</button>
  <button data-wp-on--click="actions.decreaseCounter">-</button>
</div>
See store used with the directive above
store( "myPlugin", {
  actions: {
    increaseCounter: () => {
      const context = getContext();
      context.counter++;
    },
    decreaseCounter: () => {
      const context = getContext();
      context.counter--;
    },
  },
  callbacks: {
    logCounter: () => {
      const { counter } = getContext();
      console.log("Counter is " + counter + " at " + new Date() );
    },
  },
} );
The wp-watch directive is executed:
- When the element is created
- Each time that any of the properties of the
stateorcontextused inside the callback changes
The wp-watch directive can return a function. If it does, the returned function is used as cleanup logic, i.e., it will run just before the callback runs again, and it will run again when the element is removed from the DOM.
As a reference, some use cases for this directive may be:
- Logging
- Changing the title of the page
- Setting the focus on an element with
.focus(). - Changing the state or context when certain conditions are met
wp-init
This directive runs a callback only when the node is created.
You can attach several wp-init to the same DOM element by using the syntax data-wp-init--[unique-id].
The unique-id doesn’t need to be unique globally. It just needs to be different from the other unique IDs of the wp-init directives of that DOM element.
<div data-wp-init="callbacks.logTimeInit">
  <p>Hi!</>
</div>
Here’s another example with several wp-init directives on the same DOM element.
<form
  data-wp-init--log="callbacks.logTimeInit"
  data-wp-init--focus="callbacks.focusFirstElement"
>
  <input type="text">
</form>
See store used with the directive above
store( "myPlugin", {
  callbacks: {
    logTimeInit: () => console.log( `Init at ` + new Date() ),
    focusFirstElement: () => {
      const { ref } = getElement();
      ref.querySelector( 'input:first-child' ).focus(),
    },
  },
} );
The wp-init can return a function. If it does, the returned function will run when the element is removed from the DOM.
wp-run
This directive runs the passed callback during the node’s render execution.
You can use and compose hooks like useState, useWatch, or useEffect inside the passed callback and create your own logic, providing more flexibility than previous directives.
You can attach several wp-run to the same DOM element by using the syntax data-wp-run--[unique-id].
The unique-id doesn’t need to be unique globally. It just needs to be different from the other unique IDs of the wp-run directives of that DOM element.
<div data-wp-run="callbacks.logInView">
  <p>Hi!</p>
</div>
See store used with the directive above
import { getElement, store, useState, useEffect } from '@wordpress/interactivity';

// Unlike `data-wp-init` and `data-wp-watch`, you can use any hooks inside
// `data-wp-run` callbacks.
const useInView = () => {
  const [ inView, setInView ] = useState( false );
  useEffect( () => {
    const { ref } = getElement();
    const observer = new IntersectionObserver( ( [ entry ] ) => {
      setInView( entry.isIntersecting );
    } );
    observer.observe( ref );
    return () => ref && observer.unobserve( ref );
  }, []);
  return inView;
};

store( 'myPlugin', {
  callbacks: {
    logInView: () => {
      const isInView = useInView();
      useEffect( () => {
        if ( isInView ) {
          console.log( 'Inside' );
        } else {
          console.log( 'Outside' );
        }
      });
    }
  },
} );
It’s important to note that, similar to (P)React components, the ref from getElement() is null during the first render. To properly access the DOM element reference, you typically need to use an effect-like hook such as useEffect, useInit, or useWatch. This ensures that the getElement() runs after the component has been mounted and the ref is available.
wp-key
The wp-key directive assigns a unique key to an element to help the Interactivity API identify it when iterating through arrays of elements. This becomes important if your array elements can move (e.g., due to sorting), get inserted, or get deleted. A well-chosen key value helps the Interactivity API infer what exactly has changed in the array, allowing it to make the correct updates to the DOM.
The key should be a string that uniquely identifies the element among its siblings. Typically, it is used on repeated elements like list items. For example:
<ul>
  <li data-wp-key="unique-id-1">Item 1</li>
  <li data-wp-key="unique-id-2">Item 2</li>
</ul>
But it can also be used on other elements:
<div>
  <a data-wp-key="previous-page" ...>Previous page</a>
  <a data-wp-key="next-page" ...>Next page</a>
</div>
When the list is re-rendered, the Interactivity API will match elements by their keys to determine if an item was added/removed/reordered. Elements without keys might be recreated unnecessarily.
wp-each
The wp-each directive is intended to render a list of elements. The directive can be used in <template> tags, being the value a path to an array stored in the global state or the context. The content inside the <template> tag is the template used to render each of the items.
Each item is included in the context under the item name by default, so directives inside the template can access the current item.
For example, let’s consider the following HTML.
<ul data-wp-context='{ "list": [ "hello", "hola", "olá" ] }'>
  <template data-wp-each="context.list" >
    <li data-wp-text="context.item"></li>
  </template>
</ul>
It would generate the following output:
<ul data-wp-context='{ "list": [ "hello", "hola", "olá" ] }'>
  <li data-wp-text="context.item">hello</li>
  <li data-wp-text="context.item">hola</li>
  <li data-wp-text="context.item">olá</li>
</ul>
The prop that holds the item in the context can be changed by passing a suffix to the directive name. In the following example, the default prop changes from item to greeting.
<ul data-wp-context='{ "list": [ "hello", "hola", "olá" ] }'>
  <template data-wp-each--greeting="context.list" >
    <li data-wp-text="context.greeting"></li>
  </template>
</ul>
By default, it uses each element as the key for the rendered nodes, but you can also specify a path to retrieve the key if necessary, e.g., when the list contains objects.
For that, you must use data-wp-each-key in the <template> tag and not data-wp-key inside the template content. This is because data-wp-each creates a context provider wrapper around each rendered item, and those wrappers are the ones that need the key property.
<ul data-wp-context='{
  "list": [
    { "id": "en", "value": "hello" },
    { "id": "es", "value": "hola" },
    { "id": "pt", "value": "olá" }
  ]
}'>
  <template
    data-wp-each--greeting="context.list"
    data-wp-each-key="context.greeting.id"
  >
    <li data-wp-text="context.greeting.value"></li>
  </template>
</ul>
wp-each-child
For server-side rendered lists, another directive called data-wp-each-child ensures hydration works as expected. This directive is added automatically when the directive is processed on the server.
<ul data-wp-context='{ "list": [ "hello", "hola", "olá" ] }'>
  <template data-wp-each--greeting="context.list" >
    <li data-wp-text="context.greeting"></li>
  </template>
  <li data-wp-each-child>hello</li>
  <li data-wp-each-child>hola</li>
  <li data-wp-each-child>olá</li>
</ul>
Values of directives are references to store properties
The value assigned to a directive is a string pointing to a specific state, action, or side effect.
In the following example, a getter is used to define the state.isPlaying derived value.
const { state } = store( "myPlugin", {
  state: {
    currentVideo: '',
    get isPlaying() {
      return state.currentVideo !== '';
    }
  },
} );
And then, the string value "state.isPlaying" is used to assign the result of this selector to data-wp-bind--hidden.
<div data-wp-bind--hidden="!state.isPlaying" ... >
  <iframe ...></iframe>
</div>
These values assigned to directives are references to a particular property in the store. They are wired to the directives automatically so that each directive “knows” what store element refers to, without any additional configuration.
Note that, by default, references point to properties in the current namespace, which is the one specified by the closest ancestor with a data-wp-interactive attribute. If you need to access a property from a different namespace, you can explicitly set the namespace where the property accessed is defined. The syntax is namespace::reference, replacing namespace with the appropriate value.
The example below is getting state.isPlaying from otherPlugin instead of myPlugin:
<div data-wp-interactive="myPlugin">
  <div data-wp-bind--hidden="otherPlugin::!state.isPlaying" ... >
        <iframe ...></iframe>
    </div>
</div>
The store
The store is used to create the logic (actions, side effects, etc.) linked to the directives and the data used inside that logic (state, derived state, etc.).
The store is usually created in the view.js file of each block, although the state can be initialized from the render.php of the block.
Elements of the store
State
It defines data available to the HTML nodes of the page. It is important to differentiate between two ways to define the data:
- Global state: It is defined using the
store()function with thestateproperty, and the data is available to all the HTML nodes of the page. - Context/Local State: It is defined using the
data-wp-contextdirective in an HTML node, and the data is available to that HTML node and its children. It can be accessed using thegetContextfunction inside of an action, derived state or side effect.
<div data-wp-context='{ "someText": "Hello World!" }'>

  <!-- Access global state -->
  <span data-wp-text="state.someText"></span>

  <!-- Access local state (context) -->
  <span data-wp-text="context.someText"></span>

</div>
const { state } = store( "myPlugin", {
  state: {
    someText: "Hello Universe!"
  },
  actions: {
    someAction: () => {
      state.someText // Access or modify global state - "Hello Universe!"

      const context = getContext();
      context.someText // Access or modify local state (context) - "Hello World!"
    },
  },
} )
Actions
Actions are just regular JavaScript functions. Usually triggered by the data-wp-on directive (using event listeners) or other actions.
const { state, actions } = store("myPlugin", {
  actions: {
    selectItem: (id?: number) => {
      const context = getContext();
      // `id` is optional here, so this action can be used in a directive.
      state.selected = id || context.id;
    },
    otherAction: () => {
      // but it can also be called from other actions.
      actions.selectItem(123); // it works and type is correct
    }
  }
});
Async actions
Async actions should use generators instead of async/await.
In async functions, the control is passed to the function itself. The caller of the function has no way to know if the function is awaiting, and more importantly, if the await is resolved and the function has resumed execution. We need that information to be able to restore the scope.
Imagine a block that has two buttons. One lives inside a context that has isOpen: true and the other isOpen: false:
<div data-wp-context='{ "isOpen": true }'>
  <button data-wp-on--click="actions.someAction">Click</button>
</div>

<div data-wp-context='{ "isOpen": false }'>
  <button data-wp-on--click="actions.someAction">Click</button>
</div>
If the action is async and needs to await a long delay.
- The user clicks the first button.
- The scope points to the first context, where
isOpen: true. - The first access to
state.isOpenis correct becausegetContextreturns the current scope. - The action starts awaiting a long delay.
- Before the action resumes, the user clicks the second button.
- The scope is changed to the second context, where
isOpen: false. - The first access to
state.isOpenis correct becausegetContextreturns the current scope. - The second action starts awaiting a long delay.
- The first action finishes awaiting and resumes its execution.
- The second access to
state.isOpenof the first action is incorrect, becausegetContextnow returns the wrong scope.
We need to be able to know when async actions start awaiting and resume operations, so we can restore the proper scope, and that’s what generators do.
The store will work fine if it is written like this:
const { state } = store("myPlugin", {
  state: {
    get isOpen() {
      return getContext().isOpen;
    },
  },
  actions: {
    someAction: function* () {
      state.isOpen; // This context is correct because it's synchronous.
      yield longDelay(); // With generators, the caller controls when to resume this function.
      state.isOpen; // This context is correct because we restored the proper scope before we resumed the function.
    },
  },
});
As mentioned above with wp-on, wp-on-window, and wp-on-document, an async action should be used whenever the async versions of the aforementioned directives cannot be used due to the action requiring synchronous access to the event object. Synchronous access is reqired whenever the action needs to call event.preventDefault(), event.stopPropagation(), or event.stopImmediatePropagation(). To ensure that the action code does not contribute to a long task, you may manually yield to the main thread after calling the synchronous event API. For example:
// Note: In WordPress 6.6 this splitTask function is exported by @wordpress/interactivity.
function splitTask() {
  return new Promise(resolve => {
    setTimeout(resolve, 0);
  });
}

store("myPlugin", {
  actions: {
    handleClick: function* (event) {
      event.preventDefault();
      yield splitTask();
      doTheWork();
    },
  },
});
You may want to add multiple such yield points in your action if it is doing a lot of work.
Side Effects
Automatically react to state changes. Usually triggered by data-wp-watch or data-wp-init directives.
Derived state
They return a computed version of the state. They can access both state and context.
// view.js
const { state } = store( "myPlugin", {
  state: {
    amount: 34,
    defaultCurrency: 'EUR',
    currencyExchange: {
      USD: 1.1,
      GBP: 0.85,
    },
    get amountInUSD() {
      return state.currencyExchange[ 'USD' ] * state.amount,
    },
    get amountInGBP() {
      return state.currencyExchange[ 'GBP' ] * state.amount,
    },
  },
} );
Accessing data in callbacks
The store contains all the store properties, like state, actions or callbacks. They are returned by the store() call, so you can access them by destructuring it:
const { state, actions } = store( "myPlugin", {
  // ...
} );
The store() function can be called multiple times and all the store parts will be merged together:
store( "myPlugin", {
  state: {
    someValue: 1,
  }
} );

const { state } = store( "myPlugin", {
  actions: {
    someAction() {
      state.someValue // = 1
    }
  }
} );
store() calls with the same namespace return the same references, i.e., the same state, actions, etc., containing the result of merging all the store parts passed.
- To access the context inside an action, derived state, or side effect, you can use the
getContextfunction. - To access the reference, you can use the
getElementfunction.
const { state } = store( "myPlugin", {
  state: {
    get someDerivedValue() {
      const context = getContext();
      const { ref } = getElement();
      // ...
    }
  },
  actions: {
    someAction() {
      const context = getContext();
      const { ref } = getElement();
      // ...
    }
  },
  callbacks: {
    someEffect() {
      const context = getContext();
      const { ref } = getElement();
      // ...
    }
  }
} );
This approach enables some functionalities that make directives flexible and powerful:
- Actions and side effects can read and modify the state and the context.
- Actions and state in blocks can be accessed by other blocks.
- Actions and side effects can do anything a regular JavaScript function can do, like access the DOM or make API requests.
- Side effects automatically react to state changes.
Setting the store
On the client side
In the view.js file of each block the developer can define both the state and the elements of the store referencing functions like actions, side effects or derived state.
The store method used to set the store in javascript can be imported from @wordpress/interactivity.
// store
import { store, getContext } from '@wordpress/interactivity';

store( "myPlugin", {
  actions: {
    toggle: () => {
      const context = getContext();
      context.isOpen = !context.isOpen;
    },
  },
  callbacks: {
    logIsOpen: () => {
      const { isOpen } = getContext();
      // Log the value of `isOpen` each time it changes.
      console.log( `Is open: ${ isOpen }` );
    }
  },
});
On the server side
The state can also be initialized on the server using the wp_interactivity_state() function. You would typically do this in the render.php file of your block (the render.php templates were introduced in WordPress 6.1).
The state defined on the server with wp_interactivity_state() gets merged with the stores defined in the view.js files.
The wp_interactivity_state function receives two arguments, a string with the namespace that will be used as a reference and an associative array containing the values.
Example of store initialized from the server with a state = { someValue: 123 }
// render.php
wp_interactivity_state( 'myPlugin', array (
    'someValue' => get_some_value()
));
Initializing the state in the server also allows you to use any WordPress API. For example, you could use the Core Translation API to translate part of your state:
// render.php
wp_interactivity_state( 'favoriteMovies', array(
      "1" => array(
        "id" => "123-abc",
        "movieName" => __("someMovieName", "textdomain")
      ),
) );
Private stores
A given store namespace can be marked as private, thus preventing its content to be accessed from other namespaces. The mechanism to do so is by adding a lock option to the store() call, as shown in the example below. This way, further executions of store() with the same locked namespace will throw an error, meaning that the namespace can only be accessed where its reference was returned from the first store() call. This is especially useful for developers who want to hide part of their plugin stores so it doesn’t become accessible for extenders.
const { state } = store(
    "myPlugin/private",
    { state: { messages: [ "private message" ] } },
    { lock: true }
);

// The following call throws an Error!
store( "myPlugin/private", { /* store part */ } );
There is also a way to unlock private stores: instead of passing a boolean, you can use a string as the lock value. Such a string can then be used in subsequent store() calls to the same namespace to unlock its content. Only the code knowing the string lock will be able to unlock the protected store namespaced. This is useful for complex stores defined in multiple JS modules.
const { state } = store(
    "myPlugin/private",
    { state: { messages: [ "private message" ] } },
    { lock: PRIVATE_LOCK }
);

// The following call works as expected.
store( "myPlugin/private", { /* store part */ }, { lock: PRIVATE_LOCK } );
Store client methods
Apart from the store function, there are also some methods that allows the developer to access data on their store functions.
- getContext()
- getElement()
getContext()
Retrieves the context inherited by the element evaluating a function from the store. The returned value depends on the element and the namespace where the function calling getContext() exists.
// render.php
<div data-wp-interactive="myPlugin" data-wp-context='{ "isOpen": false }'>
    <button data-wp-on--click="actions.log">Log</button>
</div>
// store
import { store, getContext } from '@wordpress/interactivity';

store( "myPlugin", {
  actions: {
    log: () => {
      const context = getContext();
             // Logs "false"
      console.log('context => ', context.isOpen)
    },
  },
});
getElement()
Retrieves a representation of the element that the action is bound to or called from. Such representation is read-only, and contains a reference to the DOM element, its props and a local reactive state.
It returns an object with two keys:
ref
ref is the reference to the DOM element as an HTMLElement. It is equivalent to useRef in Preact or React, so it can be null when ref has not been attached to the actual DOM element yet, i.e., when it is being hydrated or mounted.
attributes
attributes contains a Proxy, which adds a getter that allows to reference other store namespaces. Feel free to check the getter in the code. Link
Those attributes will contain the directives of that element. In the button example:
// store
import { store, getElement } from '@wordpress/interactivity';

store( "myPlugin", {
  actions: {
    log: () => {
      const element = getElement();
             // Logs "false"
      console.log('element attributes => ', element.attributes)
    },
  },
});
The code will log:
{
    "data-wp-on--click": 'actions.increaseCounter',
    "children": ['Log'],
    "onclick": event => { evaluate(entry, event); }
}
withScope()
Actions can depend on the scope when they are called, e.g., when you call getContext() or getElement().
When the Interactivity API runtime execute callbacks, the scope is set automatically. However, if you call an action from a callback that is not executed by the runtime, like in a setInterval() callback, you need to ensure that the scope is properly set. Use the withScope() function to ensure the scope is properly set in these cases.
An example, where actions.nextImage would trigger an undefined error without the wrapper:
store('mySliderPlugin', {
    callbacks: {
        initSlideShow: () => {
            setInterval(
                withScope( () => {
                    actions.nextImage();
                } ),
                3_000
            );
        },
})
Server functions
The Interactivity API comes with handy functions on the PHP part. Apart from setting the store via server, there is also a function to get and set Interactivity related config variables.
wp_interactivity_config
wp_interactivity_config allows to set or get a configuration array, referenced to a store namespace.
The configuration is also available on the client, but it is static information.
Consider it a global setting for interactions of a site, that won’t be updated on user interactions.
An example of setting:
wp_interactivity_config( 'myPlugin', array( 'showLikeButton' => is_user_logged_in() ) );
An example of getting:
wp_interactivity_config( 'myPlugin' );
This config can be retrieved on the client:
// view.js

const { showLikeButton } = getConfig();
wp_interactivity_process_directives
wp_interactivity_process_directives returns the updated HTML after the directives have been processed.
It is the Core function of the Interactivity API server side rendering part, and is public so any HTML can be processed, whether is a block or not.
This code
wp_interactivity_state( 'myPlugin', array( 'greeting' => 'Hello, World!' ) );
$html_content = '<div data-wp-text="myPlugin::state.greeting"></div>';
$processed_html = wp_interactivity_process_directives( $html_content );
echo $processed_html;
will output:
<div data-wp-text="create-block::state.greeting">Hello, World!</div>
wp_interactivity_data_wp_context
wp_interactivity_data_wp_context returns a stringified JSON of a context directive.
This function is the recommended way to print the data-wp-context attribute in the server side rendered markup.
$my_context = array(
    'counter' => 0,
    'isOpen'  => true,
);
?>
<div
 <?php echo wp_interactivity_data_wp_context( $my_context ); ?>
>
</div>
will output:
<div data-wp-context='{"counter":0,"isOpen":true}'>